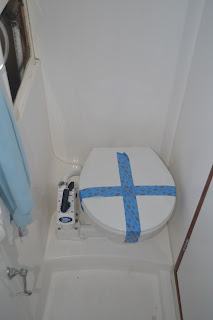
Some of you are probably already aware that
on Maple we replaced both manual seawater flushed heads with composting
heads. While I suspect most of us
don’t want to hear more than the minumum when it comes to heads, we’ve had
folks ask us on several occasions why we switched, and how the heads are
working out. This post is the
first of what will likely be at least a couple of posts on the topic. Today’s post is more about the
installation process and my adventures, but I expect we’ll do a review of
performance and our experience in the future.
Before we even purchased our boat Janet and
I both expected that we would want to change out the manual heads in the boat
with composting heads. We had read
and heard from others about the benefits of composting heads both in terms of
their impact on the earth and the general boat worthy comforts of composting
heads.
The pros: They don’t stink, the don’t have
through hulls and they don’t require a giant tank full of human excrement to be
placed in the boat.
The cons: You’ve got to dump them, they’re
not cheap, you might get bugs (though this seems controllable)
Days before we arrived in Venice we
purchased 2 composting heads from the European supplier of Natures Head. We had read and seen great reviews of
the Natures Head composting toilet and it appealed because of the simplicity of
use.
The heads arrived in Venice sometime around
September 22, just in time for me to deal with the installation of the port
side head while Janet and the kids were in London.
Phase 1: Deconstruction
Maple has 2 heads, one in the port hull and
one in the starboard. Knowing that
we would be changing out the heads in Venice we had stopped using the port head
before we arrived and had made sure the holding tank was dumped in deep water
(as required) so that I would be dealing with the least amount of yuckiness
possible (or so we thought).
Just to draw a picture for you a manual
pump head is pretty straight forward.
Once you’ve made your deposit, you pump to push the deposit to a holding
tank. Once in the holding tank it
sits until dumped, or pumped out.
As I began to unhook hoses, a surprise
awaited me (actually several, but the first was the least pleasant). Whomever had used the head last had
failed to fully pump the discharge line to the holding tank clear. By failing to pump the discharge line
clear, the previous occupant of this particular throne had left a rather smelly
surprise that rolled out at me when I unhooked the head.
There I was on my knees contorted into
the circus sideshow shape necessary to do any boat work and inches from my face
a brown tidal wave of nightmarish proportions was racing across the floor.
I did what any seasoned boat owner would do
– I put a for sale sign on the boat and went to the bar.
Actually I screamed, cried a little and
then accepted that I was wearing human waste and got on with the job. After removing the head and hoses I showered
for about a week and got back to work.
Next up was the holding tank. What appeared at first to be pretty
straightforward turned out to be anything but. I can only assume that the factory built the boat around the
tank as there was no way it was coming out of the boat without a little surgery. As I contemplated the pain that I was
facing if I tried to cut the tank in two I came to the happy realization that
only minor surgery was required, and I set about cutting off the pump out and
vent piping which provided me with the room required to wiggle the tank from
it’s cubby hole and free up an enormous storage space.
 |
| Holding Tank prior to removal. |
 |
| Hoses - yes that's what you think it is... |
Stage 2: Installation
The Natures Head is no small toilet, but
it’s not huge either. We live on a
catamaran so I figured we had lots of space (ok I did measure before ordering
too) but for some reason when the heads arrived, the looked really big…too
big. Once I had removed the manual
pump head from the port side, I had to check to see that the composting head
would fit and it did – sort of.
The head requires 2 inches from the rear
wall – no problem, but it also requires 2 inches from the right side in order
to empty it…and at least 4 inches on the left side to turn the composting crank
and operate the head. Hmmm –
that’s a problem. I have 4 inches
but not 4 inches and 2 inches on the other side…
Solution: remove the hinge that instead of
sliding the top portion of the head to the right before lifting, I can simply
lift the top part up. That
works. I love a good solution that
doesn’t require bodging things together.
Wait…our head doors open in, towards the
toilets…will they still be able to open – yes, barely. Whew that was close.
Ok so then I
just have to bolt the base down…oh wait, there is some fibreglass floor pan in
the way. I’ve got to make some
cuts to make room. If you’ve never
cut or sanded fibreglass, imagine drywall, but itchier. The dust was literally everywhere. But the head fits and functions and is
beautiful. Now – all I needed to
do was remember all of the lessons learned, and solutions employed for head
number 2 on the starboard side…


